Quickstart: Getting started with RADNAC
Get started quickly with our walk through demo configuration.
Once running, explore our follow up walk throughs to get your service production ready!
| The aim of this howto series of guides is to get you running a demo with minimal effort and incrementally improve the compliance side of the deployment. Before installing the service you intend to use, it is recommended you complete the series to understand the moving parts and then consult the detailed instructions when building your main service. |
Preflight: Checklist
-
Microsoft Azure account with an active subscription
-
You will require at least the Contributor role for the subscription
-
-
Wireless equipment supporting ‘WPA Enterprise’ (maybe labeled as ‘802.1X’) networking
-
It is strongly recommended that you use equipment supporting RadSec to improve reliability and privacy
-
The example provided describes how to configure Ubiquiti’s wireless equipment using their UniFi service as they are the only vendor offering out of the box support for both ‘WPA Enterprise’ and ‘RadSec’ at a price that is accessible to small scale deployments. If you know of others, and better still can offer instructions, please do get in touch so we may add them here.
Ubiquiti limit their access points so that you are unable to use WPA Enterprise without a UniFi controller If you do not wish to self-host a UniFi controller, Ubiquiti are not the only ones offering a hosted solution and there are other vendors that include Cloud UniFi and Uniquely Cloud; these are not endorsed services (internally we self host) but instead are provided as suggestions to start you looking for a solution that works for you. -
Other known suitable vendors you can use with RADNAC:
-
MikroTik: Suitable for more technically minded system and/or network administrators
-
Supports IPv6 (unlike Ubiquiti’s equipment) allowing you to save an additional ~$4/VM/month on your Azure infrastructure bill
-
-
Offering WPA Enterprise but not RadSec:
-
TP-Link - in particular their Omada product line
-
-
-
-
Internet connection
-
Strongly recommended is to have a static (fixed) IP address, ask your ISP if you are unsure
-
Service Principal with Elevated Permissions
During the install, RADNAC configures the complicated integration between Microsoft Entra ID, Azure and its-self on your behalf. To do this it requires a Service Principal with extra permissions that usually are not avaliable to it when installing from the Azure Marketplace.
For more details on the purpose of this Service Principal and how it is used look to our security page.
To do the preparation work for this, take the following steps:
-
Navigate to Microsoft Entra ID found at https://entra.microsoft.com/.
-
From there navigate from the left sidebar through and fill out the boxes with:
- Name
-
Set to ‘RADNAC Deployment’.
- Supported account types
-
Select from the dropdown ‘Single tenant only - Default directory’.
- Redirect URI (optional)
-
Leave this at its default of empty.
Now click on the Register button at the bottom of the page.
-
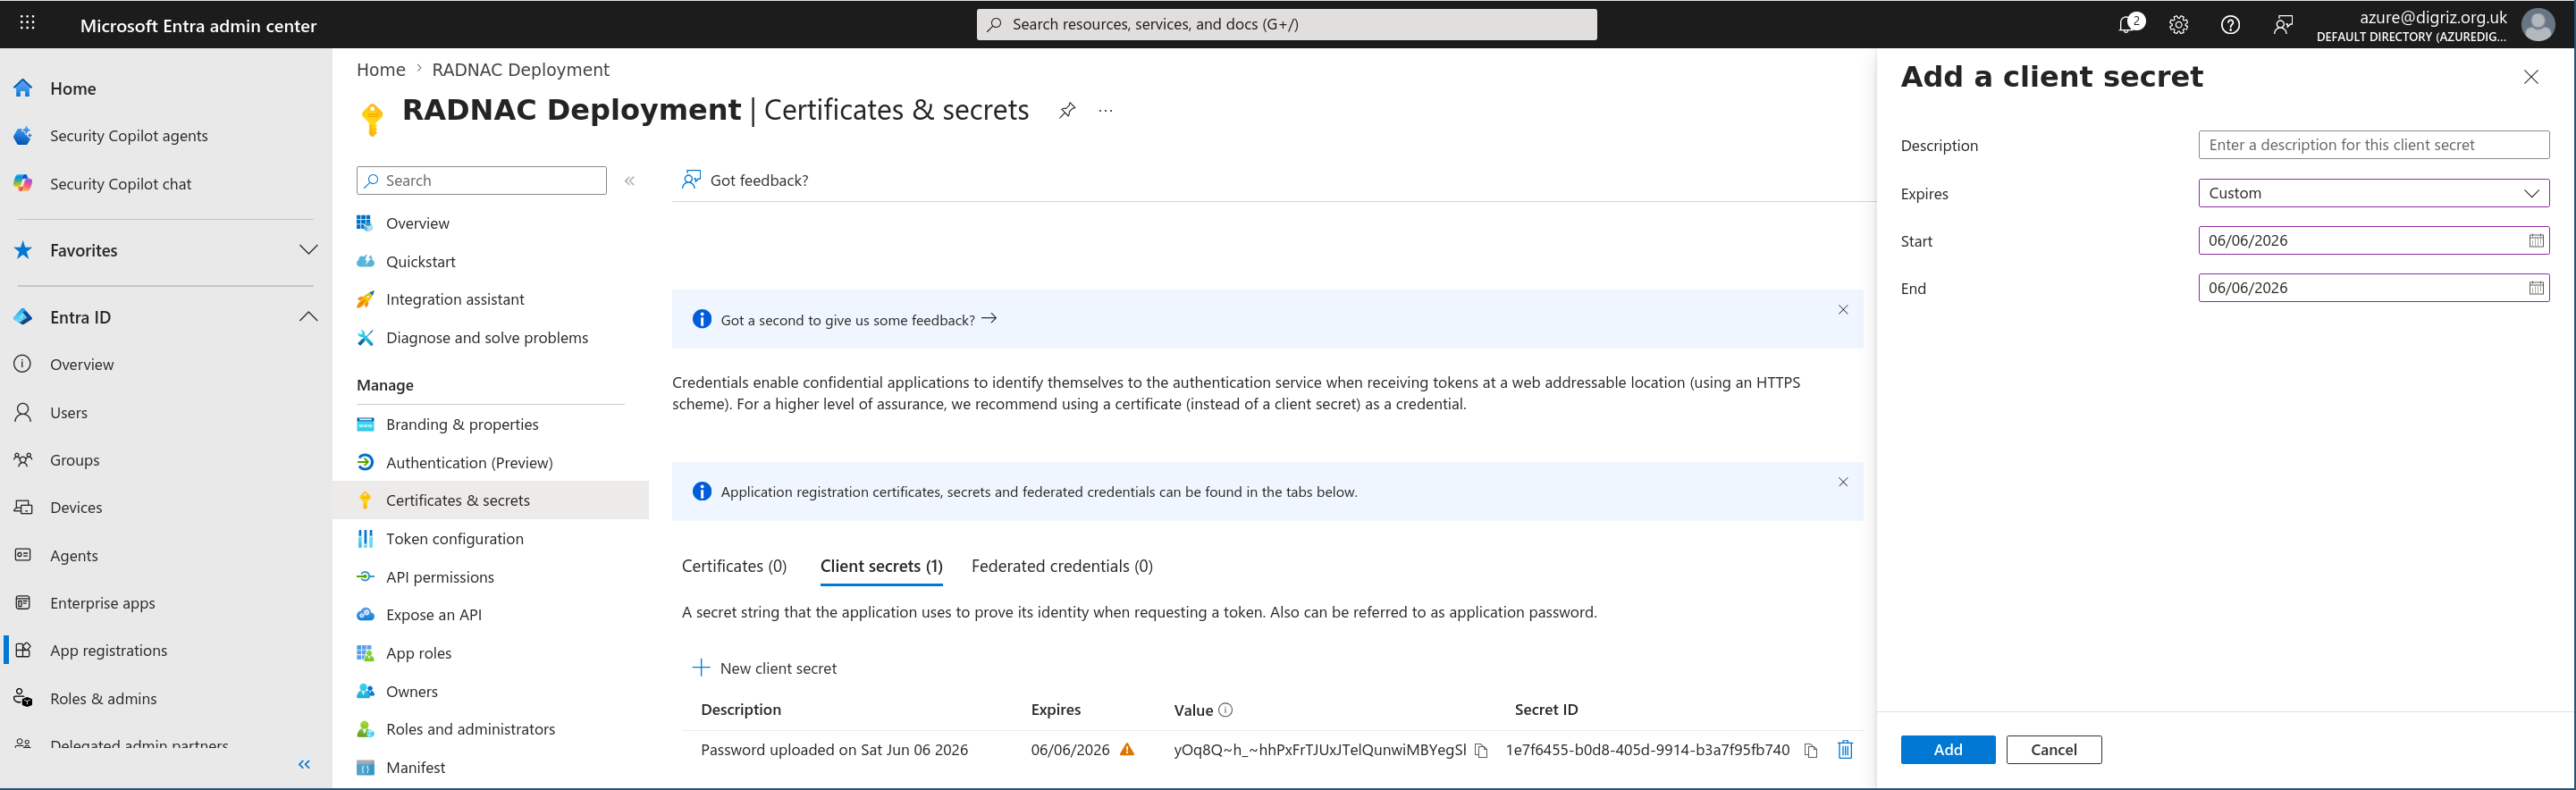
Now navigate from the inner left sidebar through , in the panel that opens:
- Description
-
Leave blank.
- Expires
-
Set to ‘90 days (3 months)’, though better is to select ‘Custom’ and set the start date to today and the end date to either today (midnight) or tomorrow.
If you select a custom date, be careful to not accidently set a future start date.
Now click on the Add button at the bottom of the panel.
-
You will be shown a credential has been added and you will to make a note of ‘Value’ (not the ‘Secret ID’) for later use, for example by using your clipboard to copy it into Notepad (Microsoft Windows) or TextEdit (macOS), this we will refer to as the ‘Client secret’ (password).
-
Now navigate from the left sidebar through .
-
Search for ‘Cloud Application Administrator’, select it to open a new panel, click on the Add assignments button at the top, search for the application registration you just created (called ‘RADNAC Deployment’, it will not show until you start typing), select it and click on the Add button at the bottom.
-
Repeat the last step also for the role ‘Privileged Role Administrator’.
Steps
What we will be covering in this howto is:
-
Installing from Marketplace
-
Adding a device to RADNAC
-
Creating a user in RADNAC
-
Installing the demo server certificate in RADNAC
-
Configuring your wireless equipment
-
Doing your first WPA Enterprise (802.1X) wireless authentication
-
Examining the logs
Installing from the Marketplace
-
Go to the RADNAC Marketplace page
-
Alternatively go to the Azure Marketplace, search for ‘RADNAC’ and make sure the publisher listed for the offer is ‘coreMem Limited’
-
-
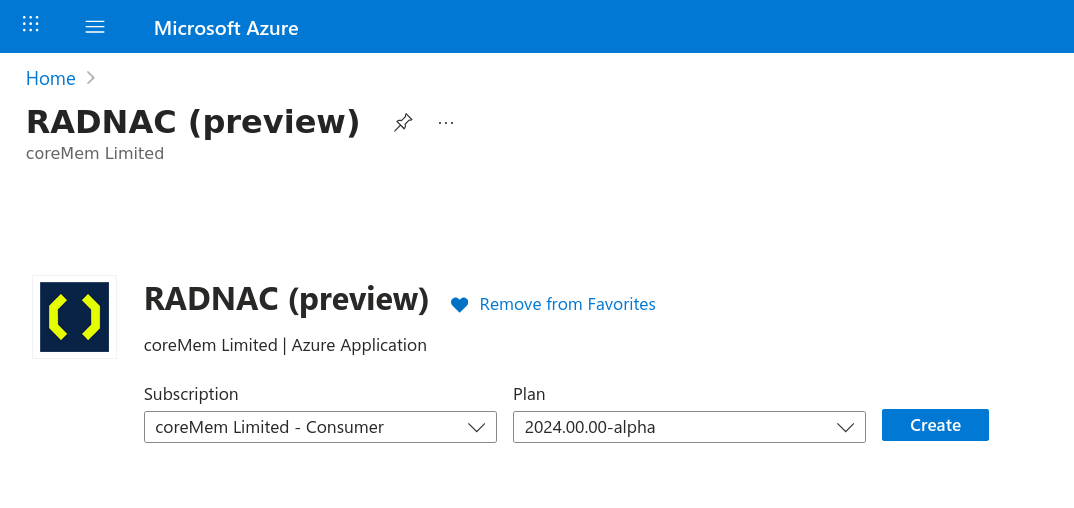
Click on it and you will be presented with the option to:
-
Pick the subscription to install the service to
-
Select the plan (without support) that you wish to try
-
If you are uncertain, pick the 'Home' tier though if you are planning to use proxying you may want one of the higher tiers.
-
You should only choose a plan with support after contacting us as it allows coreMem Limited access to your deployment so should only be done if you really need this
-
-
-
Click on Create to begin the installation Wizard
| Throughout the wizard, many fields provide a small information icon that you may hover over to get more information on how it affects the deployment. |
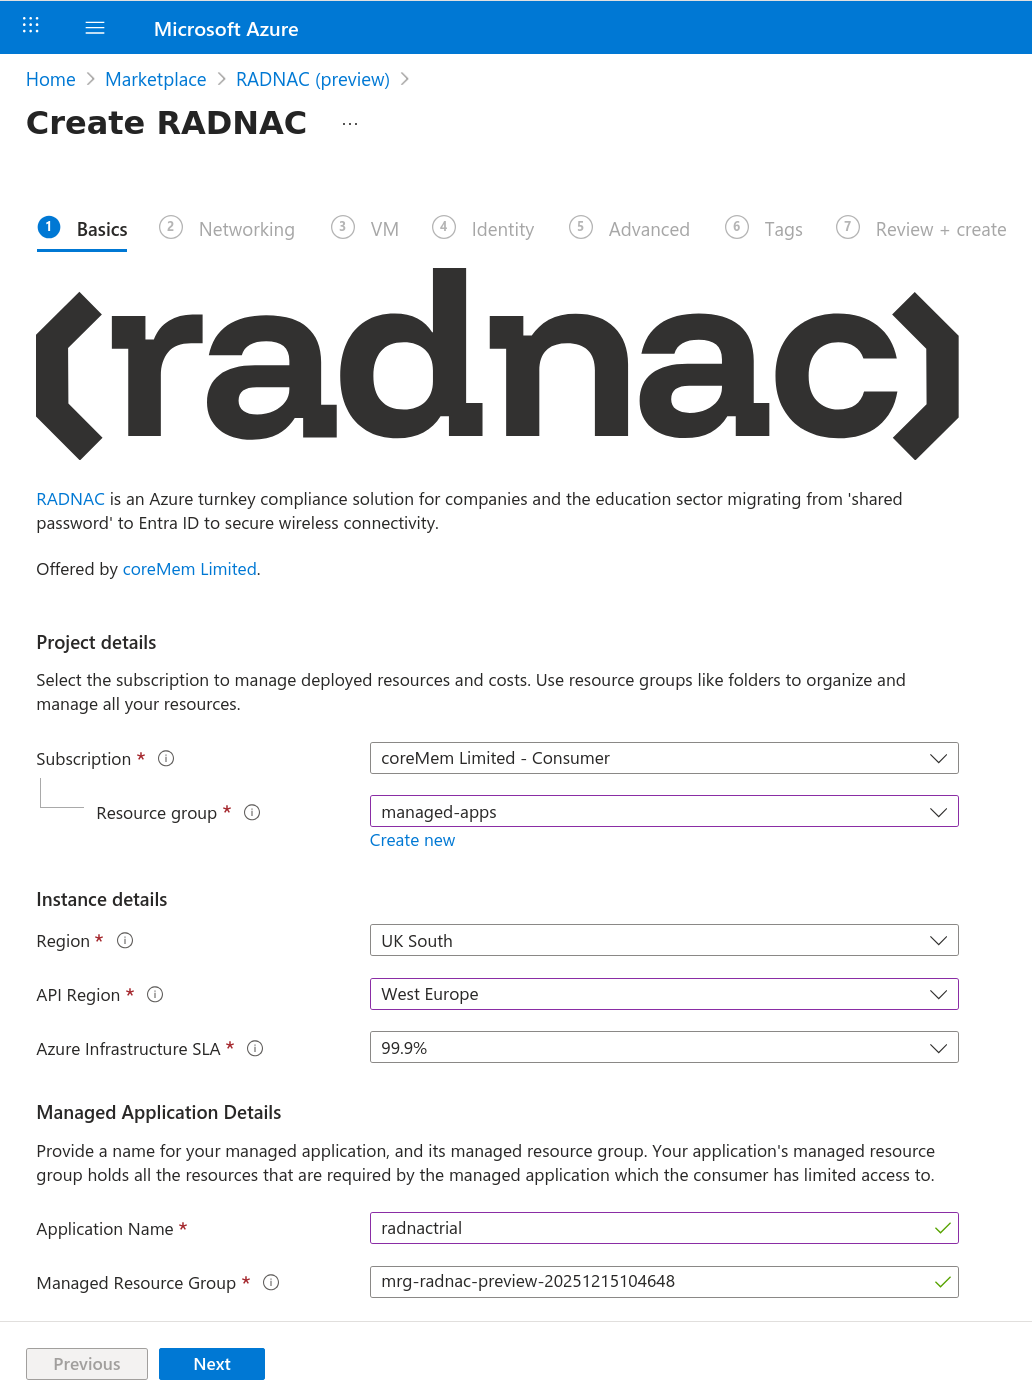
For the first step (labeled ‘Basics’):
-
Verify the correct subscription you want to use is selected
-
If you see a warning about unregistered ‘Resource Providers’, check the box ‘Register Resource Providers’
-
-
Select the ‘Resource Group’ to install the managed application to, this is where you interact with RADNAC
-
Select a ‘Region’ near to your location (where you want your data stored)
-
Set the ‘Application Name’, the name that will be used for the resource created in the ‘Resource Group’ provided above, to the value ‘radnacdemo’
-
Leave all other fields at their defaults
-
Click the Next button at the bottom left to move to the next section
For the second step (labeled ‘Service Principal’):
-
Select the Service Principal you prepared during the Preflight
- Service principal type
-
Choose ‘Select existing’.
- Service principal
-
Click on ‘Make selection`, search for the Service Principal you prepared (called '`RADNAC Deployment’), select it and click on the Select button.
- Client secret
-
Type in the client secret you made a note of earlier that is associated with the Service Principal.
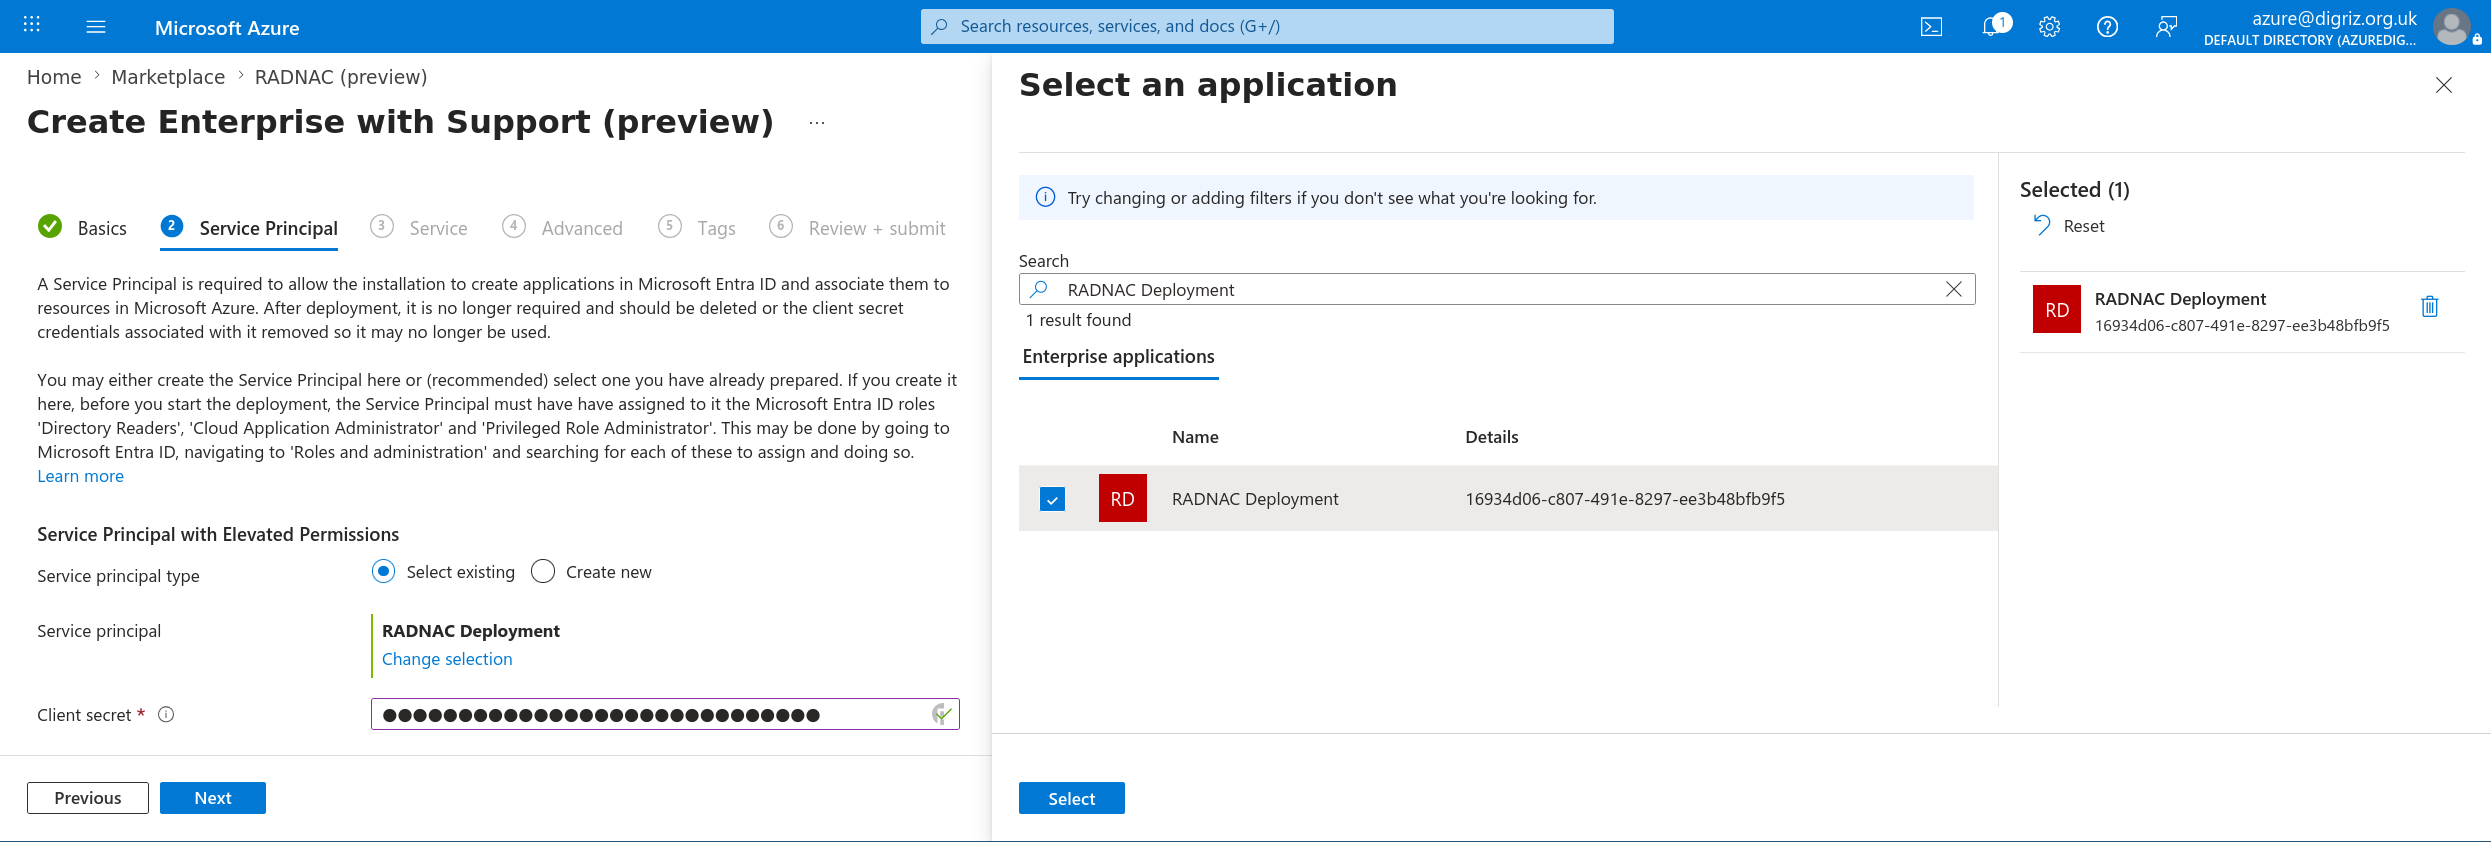
-
Click the Next button at the bottom left to move to the next section
For all the remaining steps leave the fields at their defaults, clicking the Next button at the bottom left to move to the next section until you reach ‘Review + submit’ where you click on the Create button at the bottom left to begin the deployment process.
Deployment
This process typically takes less than ten (10) minutes, though depending on how busy your selected Azure location is, it may take upward of thirty (30) minutes to complete, once it completes you should see something that looks like the following which is when you should click on the Go to resource button.
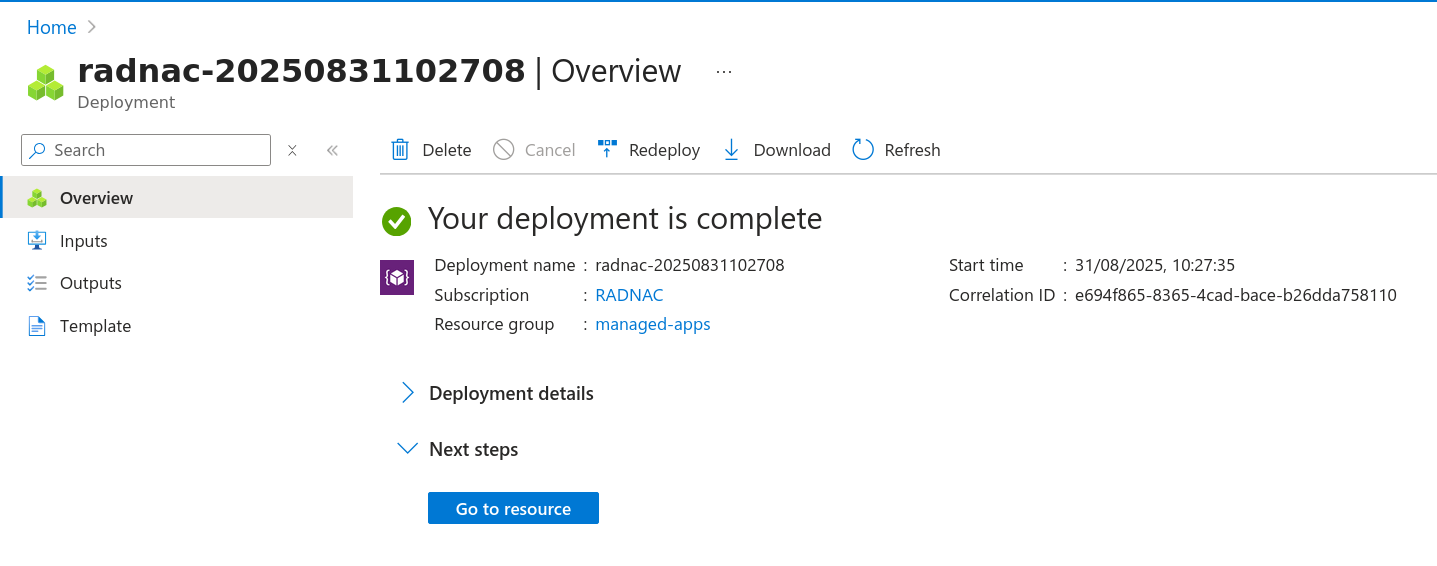
From here you should see ‘radnacdemo’ (called a ‘Managed Application’ resource) and upon clicking on it you will be presented with the primary entry point into RADNAC from where you can discover the web user interface as well as server IP addresses and API endpoints used to interact with RADNAC. We will refer to this page as the ‘managed application’ page throughout the rest of this howto.
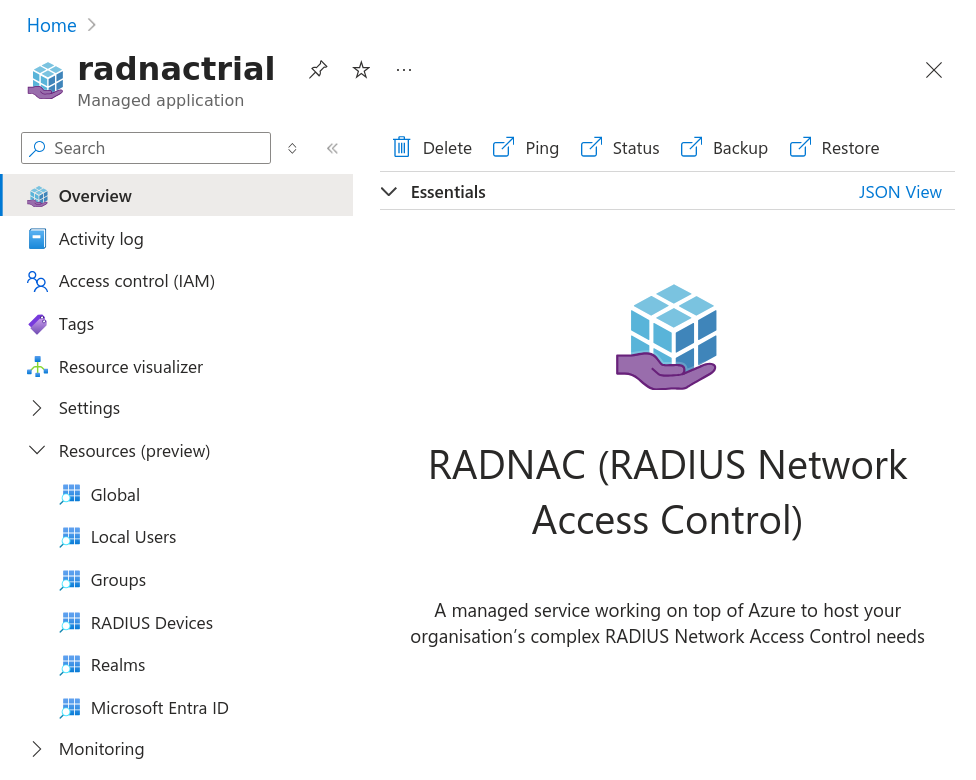
The main text content found slightly to the bottom right provides an overview of where to find things and links to the product page and its documentation.
Web Interface
To access the RADNAC web interface, navigate the left sidebar panel Parameters and Outputs and listed at the bottom, under the ‘Outputs’ section, you will find the value for ‘endpointUserInterface’ which is the URL you should paste into your web browser.
You will be presented with a Sign In button that when clicked presents a familiar ‘Login by Microsoft’ popup.
| When you log in for first time, you will need to provide consent for both the user interface (‘RADNAC Web based user interface’) and the backend API (‘RADNAC API’) to access Microsoft Azure and Microsoft Entra ID on behalf of you. |
We will refer to this page as the ‘web user interface’ throughout the rest of this howto.
Service Principal Cleanup
If everything has worked so far, it means the installation was successful and you now should delete the Service Principal you prepared during Preflight so it may no longer be used.
To do this:
-
Navigate to Microsoft Entra ID found at https://entra.microsoft.com/.
-
From there navigate from the left sidebar through , search for the Service Principal you created (‘RADNAC Deployment’) and select it.
-
In the panel that opens click on the Delete button at the top.
-
Alternatively if you wish to retain it instead for purposes of reuse, navigate from the inner left sidebar and delete all the listed client secrets by clicking on the bin icon to the right of any entries your find.
-
Adding a device to RADNAC
For this step you will need the public IP addresses that your Internet connection is assigned.
If you do not know them ask your ISP otherwise look to the sub-section below titled Discovering your Public IP Address(es), if they are not static IP addresses (ie. ‘dynamic’) or you do not know, then look to the subsection below titled Dynamic Public IP Address(es).
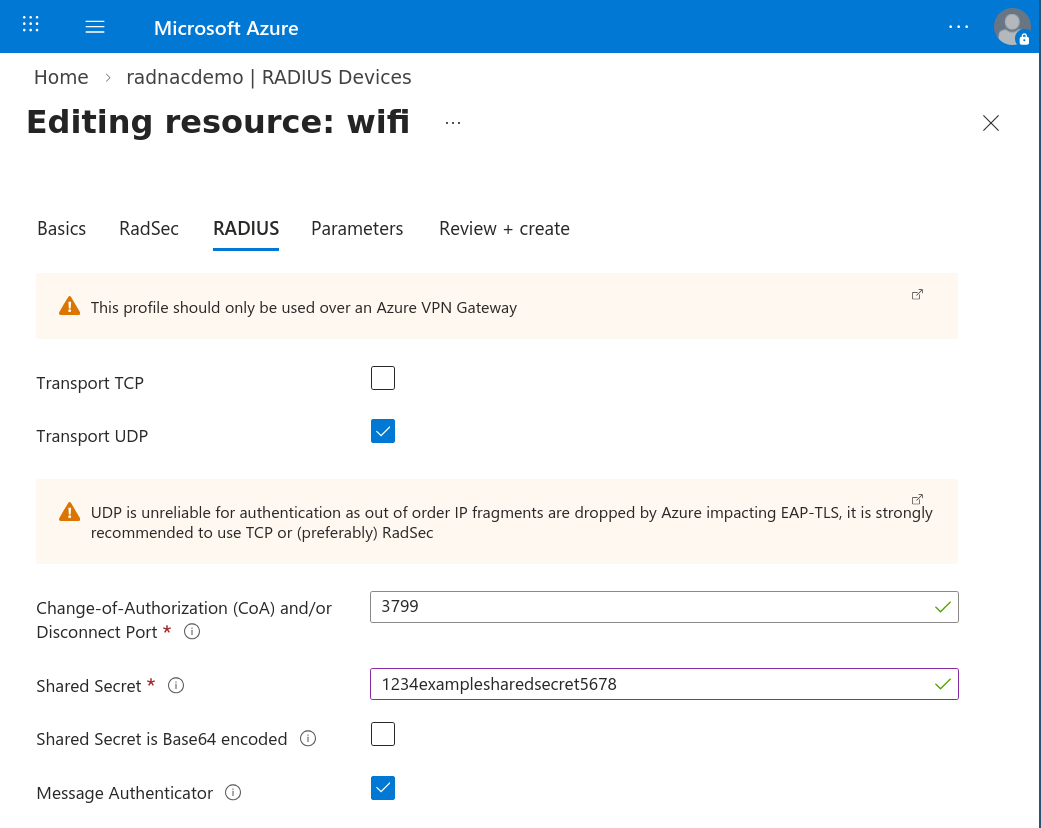
From the web user interface, click on the RADIUS Devices tab and then the Add button at the top right. For the values requested, provide a name for your wireless equipment (eg. wifi), add your public IP address(es) comma separated into the ‘IP Addresses’ box and leave at their defaults ‘Intranet’ (enabled) and ‘Roles’ (‘Client’ only).
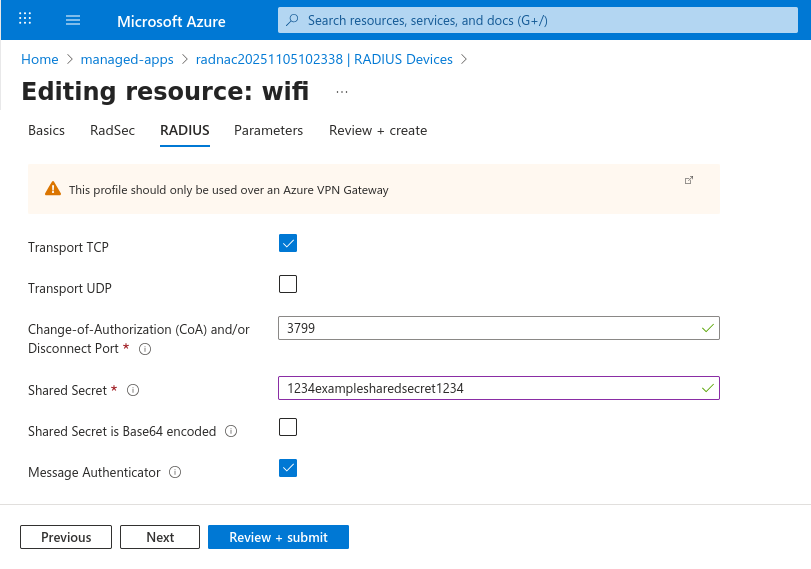
Now click on the RADIUS tab at the top of the configuration page, check the ‘Transport UDP’ checkbox, set ‘Shared Secret’ to an unguessable value and leave the other fields at their defaults (‘Shared Secret is Base64 encoded’ unchecked, ‘Message Authenticator’ checked, …). Now click on the Create button at the bottom of the page.
Discovering your Public IP Address(es)
You can skip this entire section if you know your public IP addresses and have already entered them above.
You should be able to obtain what your public IP address(es) are from your ISP or the materials they provided to you when you signed up with them.
If not, they should match the ones your computer and mobile devices use when connected to your existing wireless network service so you infer them from an online IP reporting tool from your web browser.
On this page, you will need to make a note of both the IPv4 and IPv6 addresses shown.
| It is okay if only one of the two IP addresses (often the IPv6 address) is not listed. This is due to a limitation of your ISP (or router) though fortunately not something most users would be aware of. |
If you have dynamic public IP address(es), or are unsure, go to the next section otherwise use these found values to configure RADNAC as per the instructions above.
Dynamic Public IP Address(es)
If you have only a dynamic public IP address(es), or do not know so assume they are, you will need to use an online tool from your browser to create a usable approximation for your address(es) in CIDR notation.
| If your wireless equipment does not support RadSec or your router or an on-premise VPN appliance does not support making a VPN connection to Azure, it is strongly recommended you use an ISP that provides you with ‘static (fixed) IP addresses’. Where this is the case, and you still plan to use dynamic IPs (common for non-business tier ISP services) when your router reconnects to the Internet your public IP address(es) will change and the effect will be that your wireless network will stop working until you update the device IPs configuration made above with the new addresses. For those where RadSec or a VPN is an available option to you, a later guide will walk you through implementing a more resilient (and secure) configuration suitable for use with dynamic public IP address(es). |
If you have an IPv4 address, then open https://ipv4.bgp.he.net/ and capture the bottom most ‘Announced’ listed CIDR:
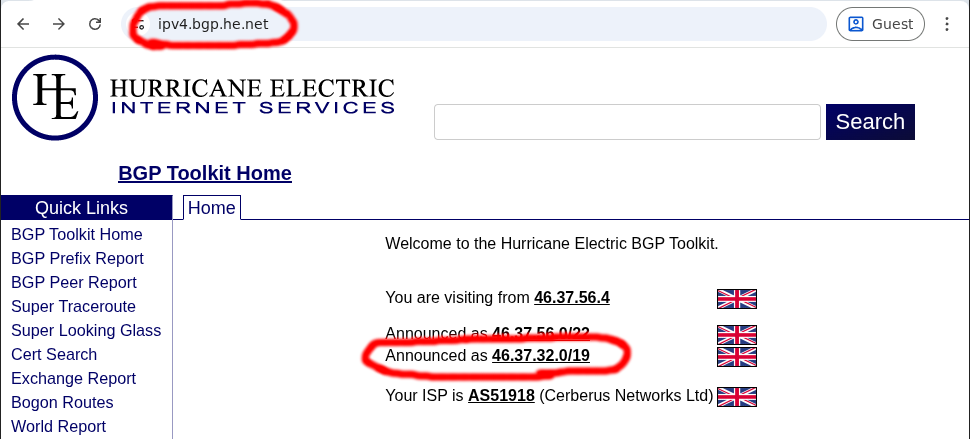
If you have an IPv6 address, then open https://ipv6.bgp.he.net/ and capture the bottom most ‘Announced’ listed CIDR:
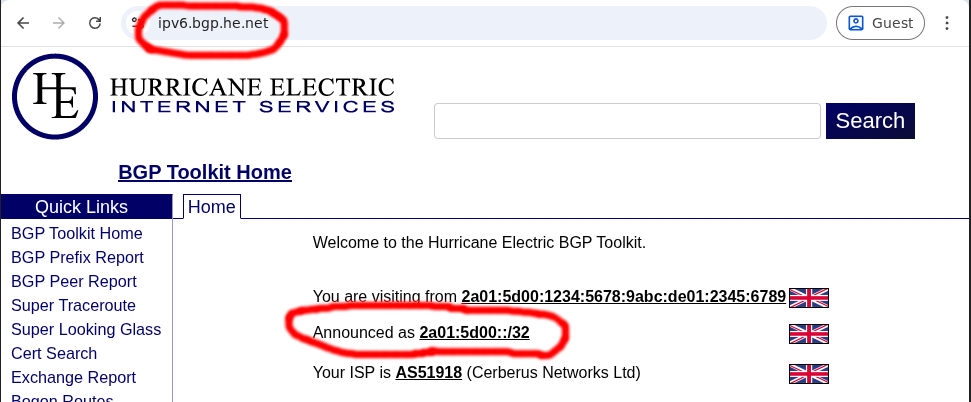
| You may find the IPv6 address page above does not open for you, this is okay and you can just skip collecting the results there, but you must have at least an IPv4 address. |
Now use these obtained CIDR’s to configure RADNAC as per the instructions above.
| These CIDRs are approximations and only suitable only for the purpose of the demo. |
Creating a user in RADNAC
From the web user interface, click on the Local Users tab and then the Add button at the top right. For the values provide a username (eg. ‘bob’) and password (eg. ‘hello’), leaving the ‘Group Memberships’ field empty.
| Do not use any existing passwords known to you here. This demo aims to allow you to get RADNAC running as quickly as possible and a later guide will walk you though securing how your passwords are transmitted (the ‘S(ecure)’ in ‘HTTPS’). |
Now click the Create button at the bottom left of the page.
Installing the demo server certificate in RADNAC
There two parts to this step:
-
Create an Azure Key Vault, grant yourself and RADNAC permission to use it and import the demo server certificate
-
Configure RADNAC to use the demo server certificate
Creating an Azure Key Vault
-
In the main Azure Portal, navigate to ‘Resource groups’ by typing into the search box at the top ‘resource groups’ and clicking on it.
-
Create a new resource group by clicking on the Create button at the top, provide the name ‘radnacmisc’ (for the purpose of this demo) then click on the Review + create button at the bottom and after reviewing, click on the Create button at the bottom.
-
Once the resource group has been created (you may need to click the Refresh button at the top), now either:
-
Directly navigating to the create Azure Key Vault wizard.
-
Manually locating the Key Vault creation wizard by:
-
Clicking on your newly created resource group (you may need to click the Refresh button at the top) and from within it, click on the Create at the top of the pane that opened.
-
You will be taken to the Azure Marketplace where you search for ‘key vault’, press the Enter and then check the checkbox ‘Azure services only’.
-
Find the item listed as ‘Key Vault’ by Microsoft (should be the first item) and click on it.
-
On the overview page you are presented with, click on the Create button.
-
-
-
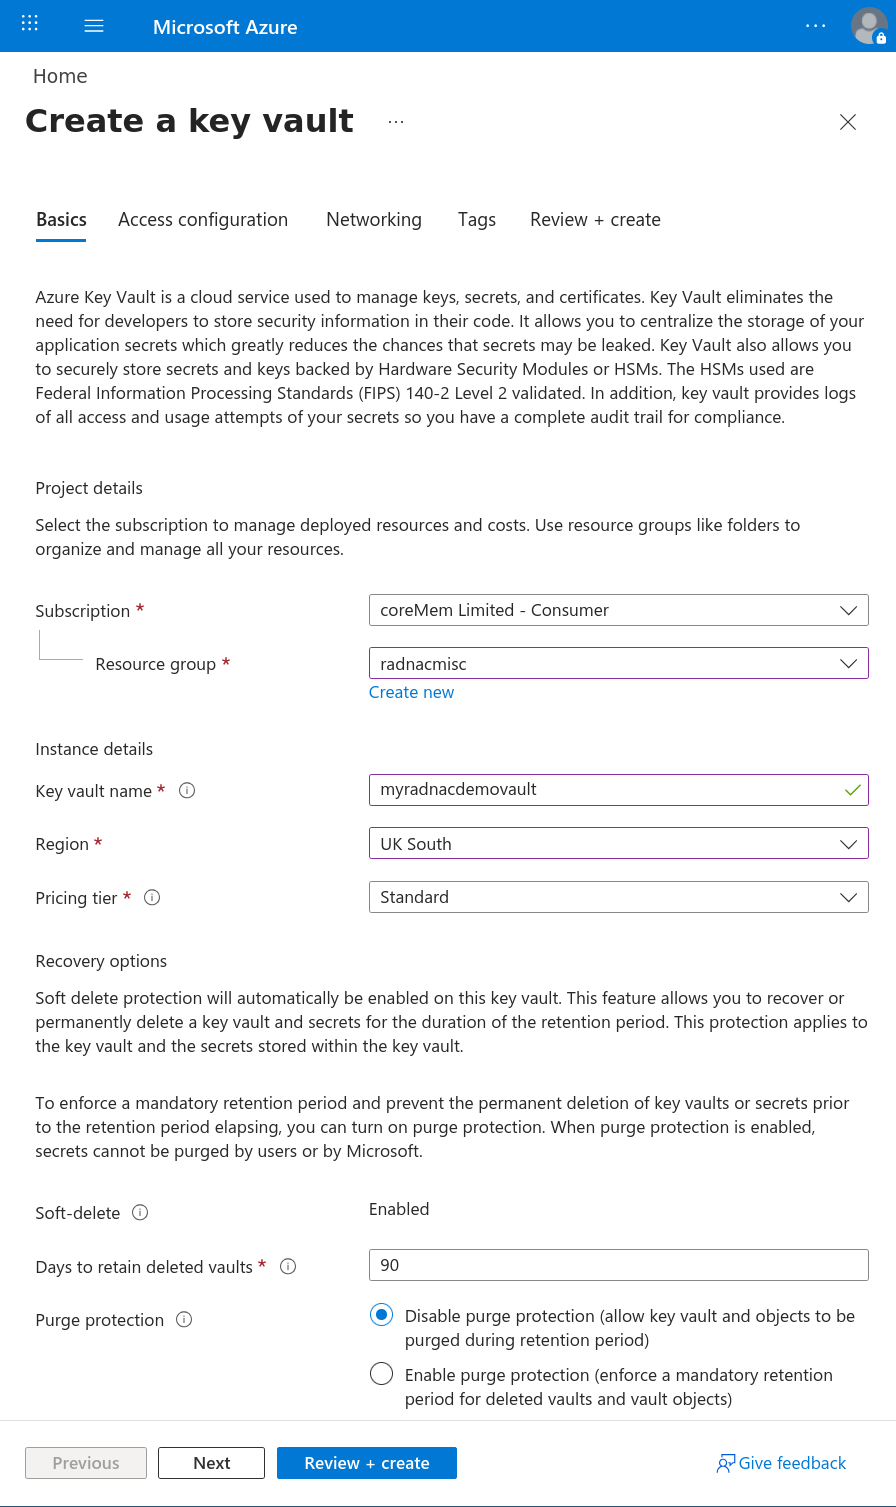
In the wizard, select your newly created resource group to deploy the Key Vault to, provide it a name, a region close to you and leave all other fields left at their defaults (eg. ‘Pricing tier’ at ‘Standard’, ‘Days to retain deleted vaults’ at 90 days, …) and click on the Review + create button at the bottom.
-
On the ‘Review + create’ step, click on the Create button, wait for the Key Vault to be deployed and then click on the Go to resource button.
-
To grant access to the Key Vault for both yourself and RADNAC, you will need navigate to on the left hand menu to open the add role wizard
If you do not have ‘Owner’ or ‘User Access Administrator’ access you will need to seek assistance from your IT administrator to complete the rest of this section -
Select and then in the Members menu tab, for ‘Assign access to’ select the User, group, or service principal radio button, and under the Members menu select yourself, then Review + assign at the bottom of the page
-
Repeat the add role wizard, though this time select and then in the Members menu tab, for ‘Assign access to’ select the ‘Managed identity’ radio button, and under the Members menu select and choose
radnacdemo, then Review + assign at the bottom of the page on, and under the Members menu select yourself, then Review + assign at the bottom of the page -
Download the demo server certificate.
-
Navigate to the certificate importing wizards by click through the menu
-
Select ‘Import’ from the ‘Method of Certificate Creation’ dropdown, set the ‘Certificate Name’ to ‘radnacdemocert’, upload the downloaded
radnacdemocert.pfxcertificate from above, leave the ‘Password’ field blank and then click on the Create button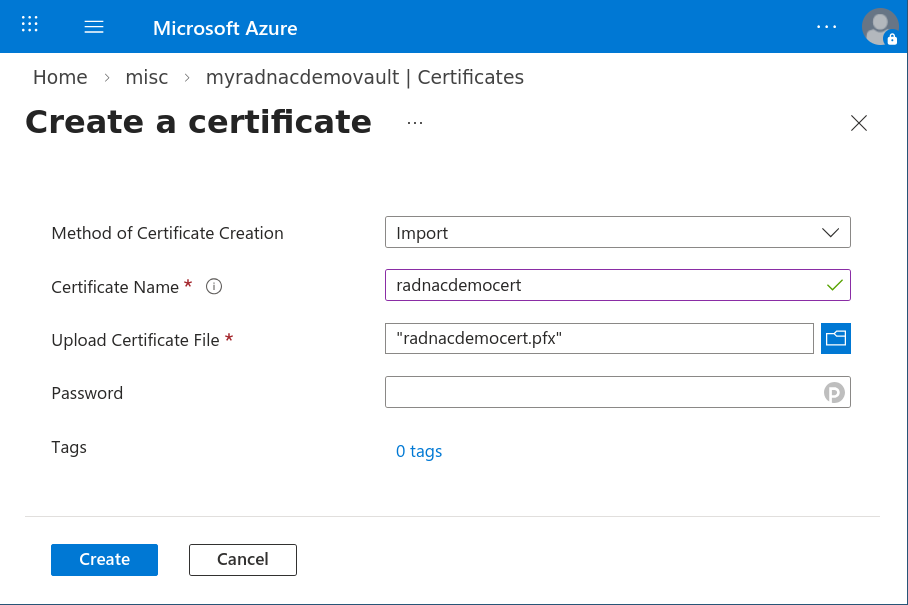
Using the server certificate
-
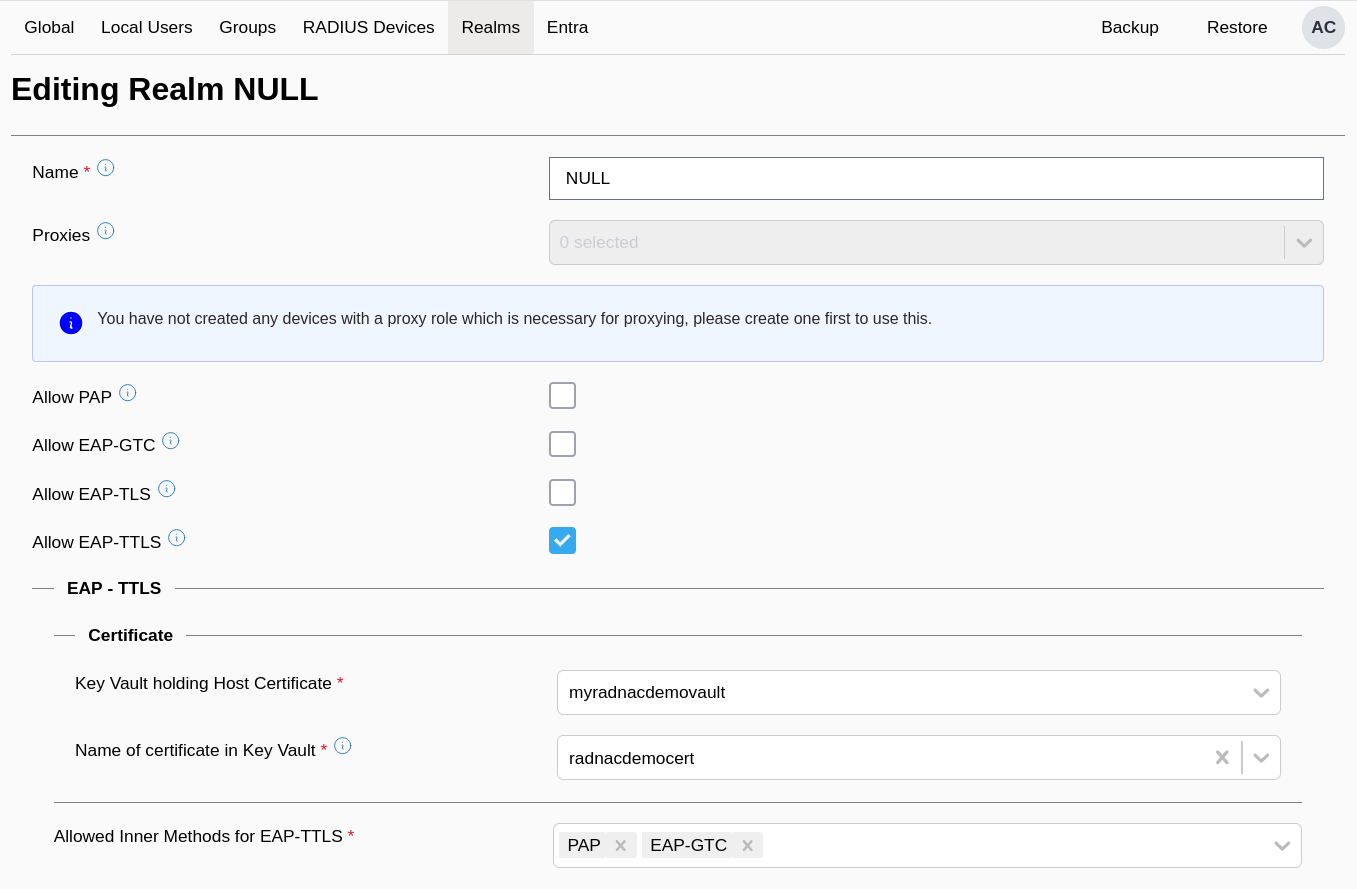
From the web user interface, click on the Realms tab and then click on the table entry '
NULL-
Ignore the other entries for now, we will come back to this in a later howto guide to configure the Microsoft Entra ID integration.
-
-
Check the ‘Allow EAP-TTLS’ option
-
From the ‘Key Vault holding Host Certificate’ dropdown select the Key Bault you created above and for ‘Name of certificate in Key Vault’ use the dropdown to select the certificate.
-
For the ‘Allowed Inner Methods for EAP-TTLS’ leave at its default of both ‘PAP’ and ‘EAP-GTC’ being checked
It is important to include ‘EAP-GTC’ to support automatic device configuration when using macOS and iOS -
Click on the Save button at the bottom.
-
You will be brought back to the main Realm table listing tab where it should show for the ‘
NULL’ entry the configuration as “Methods allowed EAP-TTLS[Using 'radnacdemocert' from the Key Vault '(yourkeyvault)']/{PAP,EAP-GTC}” and status as ‘EAP-TTLS: OK’ with no action being required.
Configuring your wireless equipment
For this we need the IP addresses RADNAC provides for the service. To obtain these go to the managed application page and navigate the menu on the right and listed at the bottom, under the ‘Outputs’ section, are the values we need (your values will be different):
-
‘serviceIPv4’: our example will use the value ‘
203.0.113.14’ -
‘serviceIPv6’: our example will use the value ‘
2001:db8:1016:2::1fe’
| The values for ‘secondaryIPv4’ and ‘secondaryIPv6’ will be blank as for the demo only a single service instance was created |
Open a new browser window to the administrative management page for your wireless equipment.
| Every vendor is different, so if you are not using Ubiquiti’s equipment, you likely will have to read the documentation or seek support for your existing wireless equipment. Fortunately searching for ‘WPA Enterprise’ and ‘RADIUS’ in your instructions will get you close to what you need, then you hopefully will just need to copy values found here into the user interface of your equipment. |
In Ubiquiti’s user interface, you need to navigate the menu , scroll to the ‘RADIUS’ section of the page and then click ‘Create New’.

In the right side bar panel titled ‘Add RADIUS Server’, fill in the fields with name set to ‘radnacradius’, leave the VLAN (Wired and Wireless networks) and TLS checkboxes unchecked, type in the ‘serviceIPv4’ from above as the ‘IP Address’, leave ‘Port’ set to its default (1812) and type in the shared secret you used when adding a device to RADNAC earlier. Now click on the `Add’ immediately below the shared secret textbox.
| We will not use the ‘serviceIPv6’ field as the UniFi equipment does not support it |
Check the ‘Accounting’ checkbox and similarly as above add the ‘IP Address’, leave ‘Port’ set to its default (1813), type in the shared secret and click on the `Add’ immediately below the shared secret textbox.
Lastly check ‘Interim Update Interval’, but change the time period to 300 seconds. Now click on the Add button at the bottom of the right side panel.
Now we will create a new wireless network for your mobile phone to connect to. Navigate the menu and click on ‘Create New’ found near the top. Set the fields as:
-
Name:
radnacwifi -
Network: Native Network
-
Advanced: Manual
-
Security Protocol: WPA2 Enterprise
-
RADIUS Profile:
radnacradius
Leave all other fields at their defaults and click on the Add WiFi Network button at the bottom.
Connecting using WPA Enterprise (802.1X)
Finally it is time to connect to your new wireless network.
Android
-
Open the wireless settings page by either
-
Long press holding the wireless tile
-
Navigate to
-
-
After a few moments your phone should show the ‘radnacwifi’ wireless network from the list of available networks
-
Tap on the ‘radnacwifi’ entry
-
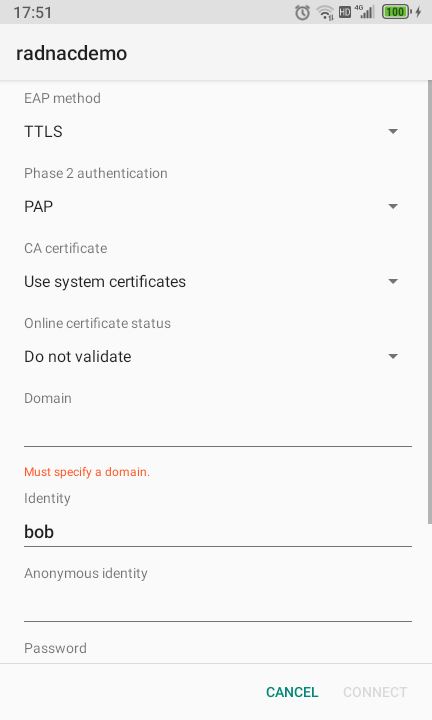
A configuration dialog will open where you should set:
- EAP method
-
TTLS
- Phase 2 authentication
-
PAP
- CA certificate
-
Select ‘Trust on First Use’ (Android 13 or later) or if not an option use ‘None’ (Android 12) or ‘Do not validate’ (Android 11 and earlier)
In a later guide we describe how to secure this but for the purpose reducing friction in our demo we are skipping this for now. - Identity
-
Type in the username of the user you created in RADNAC (eg. ‘bob’)
- Password
-
Set to the password of the user you created in RADNAC (eg. ‘hello’)
-
Leave all other fields at their default values
-
Click on the Connect button at the bottom
-
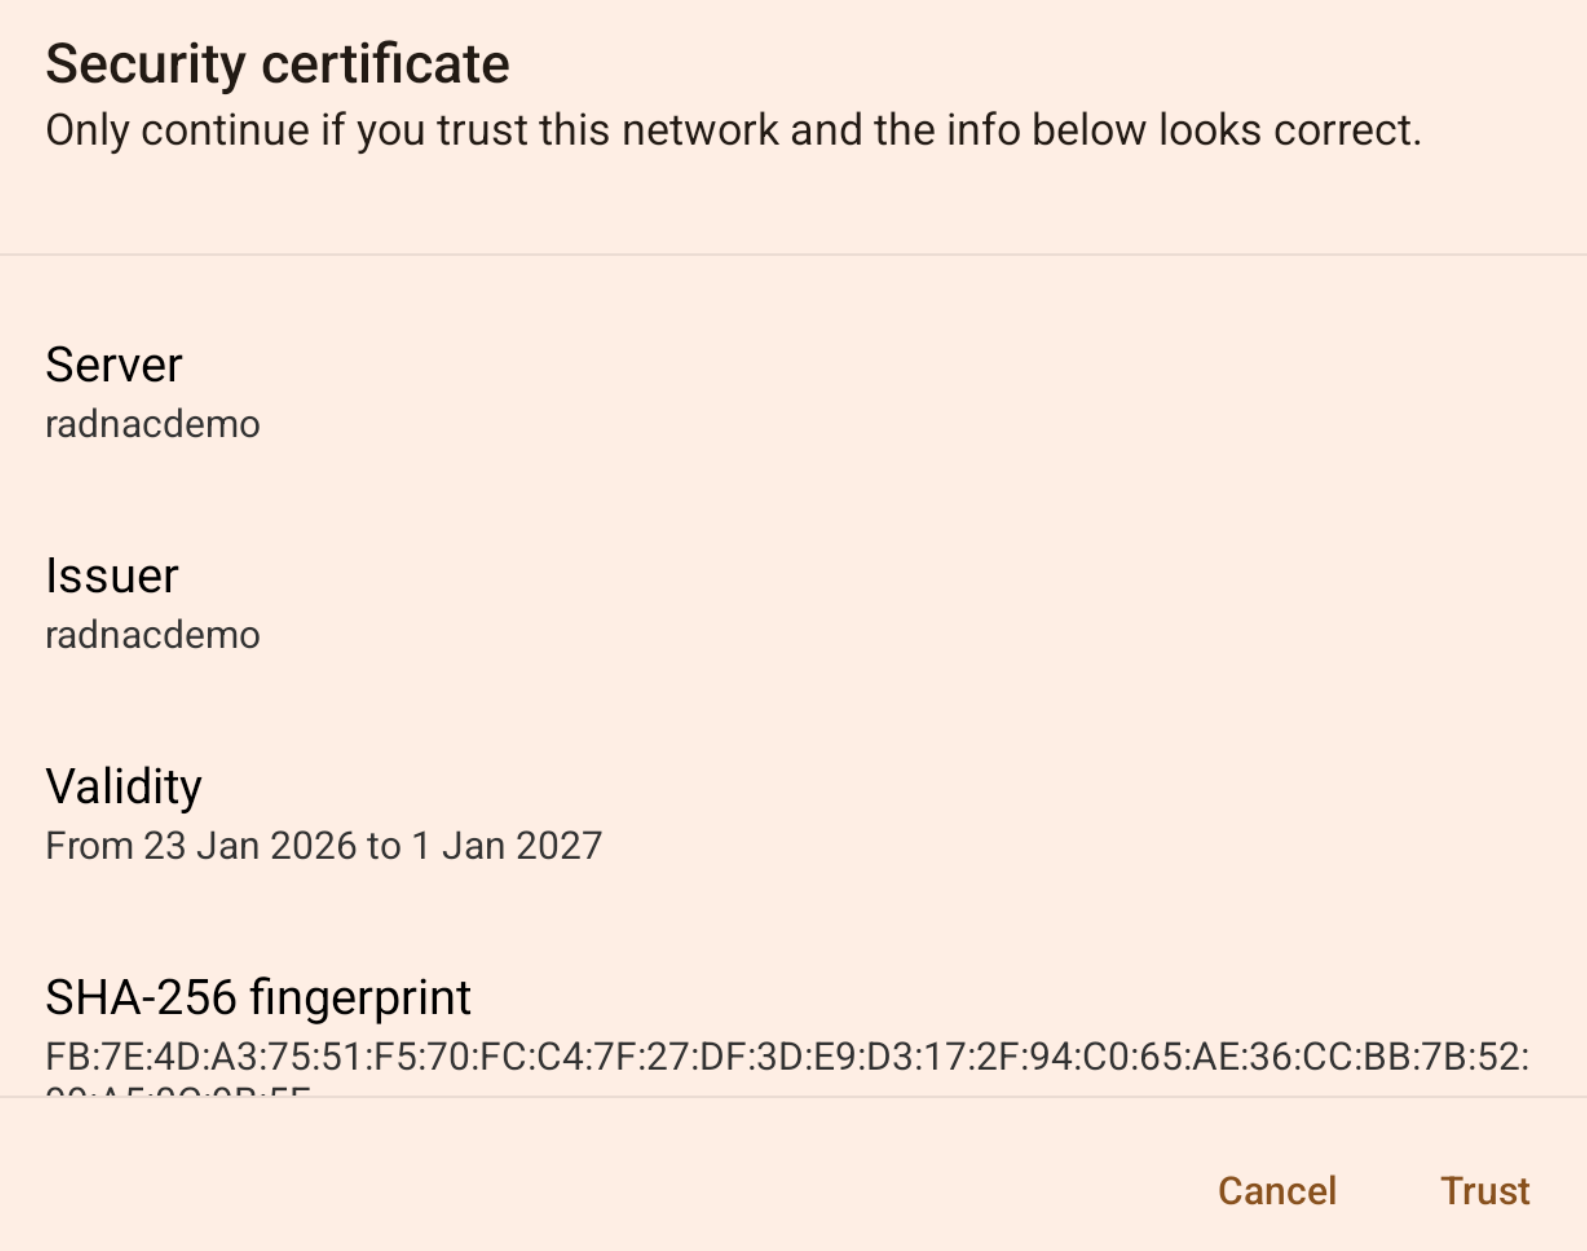
If using Android 13, you may be prompted to confirm that you trust the network, it should show ‘radnacdemo’ and you should click on ‘Yes, connect’
-
You should now be connected
Apple iOS
-
Open the wireless settings page by going to
-
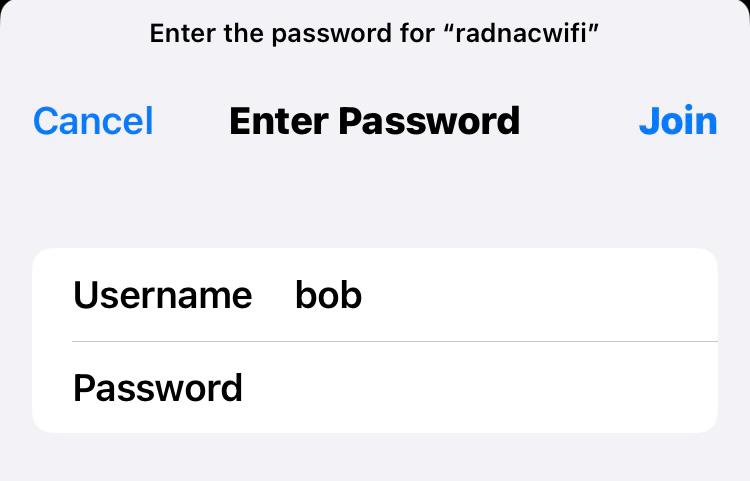
Tap on your new wireless network ‘radnacwifi’
-
You will be prompted for a username (eg. ‘bob’) and password (eg. ‘hello’), use the values for the user you created above in RADNAC
-
Tap on ‘Join’ in the top right
-
You will be presented with a dialog asking you if you trust the ‘radnacdemo’ certificate, which you should tap ‘Trust’ in the top right
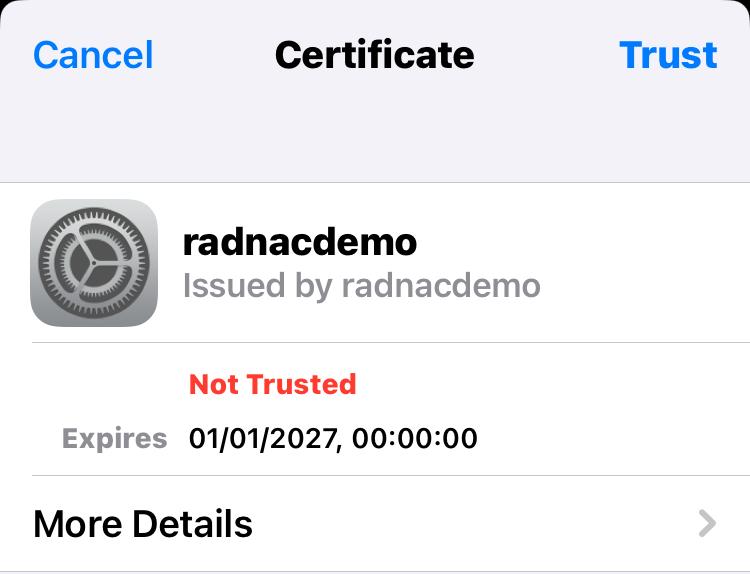
-
You should now be connected
Microsoft Windows 11
-
Open the wireless networks listing by clicking on the wireless icon in the bottom
-
Click on the right chevron (‘>’) to access
'Manage Wi-Fi connections'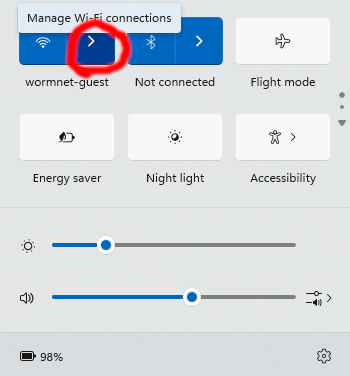
-
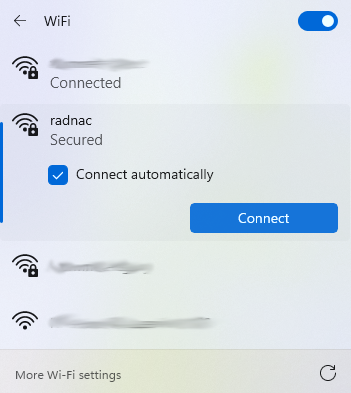
Click on ‘radnacwifi’ and then on ‘Connect’
-
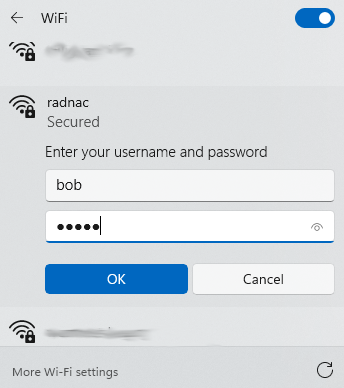
You will be prompted for a username (eg. ‘bob’) and password (eg. ‘hello’), use the values for the user you created above in RADNAC
-
Click on ‘OK’
-
You will be presented with a dialog asking you if you trust the network and optionally review the certificate details, click on ‘Connect’
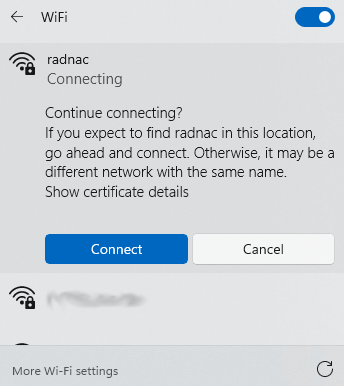
-
You should now be connected
Examining the logs
Logs are usually available almost immediately, usually with less than a minute delay, though for a fresh install it may take as long as twenty (20) minutes before they start being visible.
To see the logs of your login:
-
Go to the managed application page and click on the linked next to the ‘Managed resource group’ near the top right of the page.
-
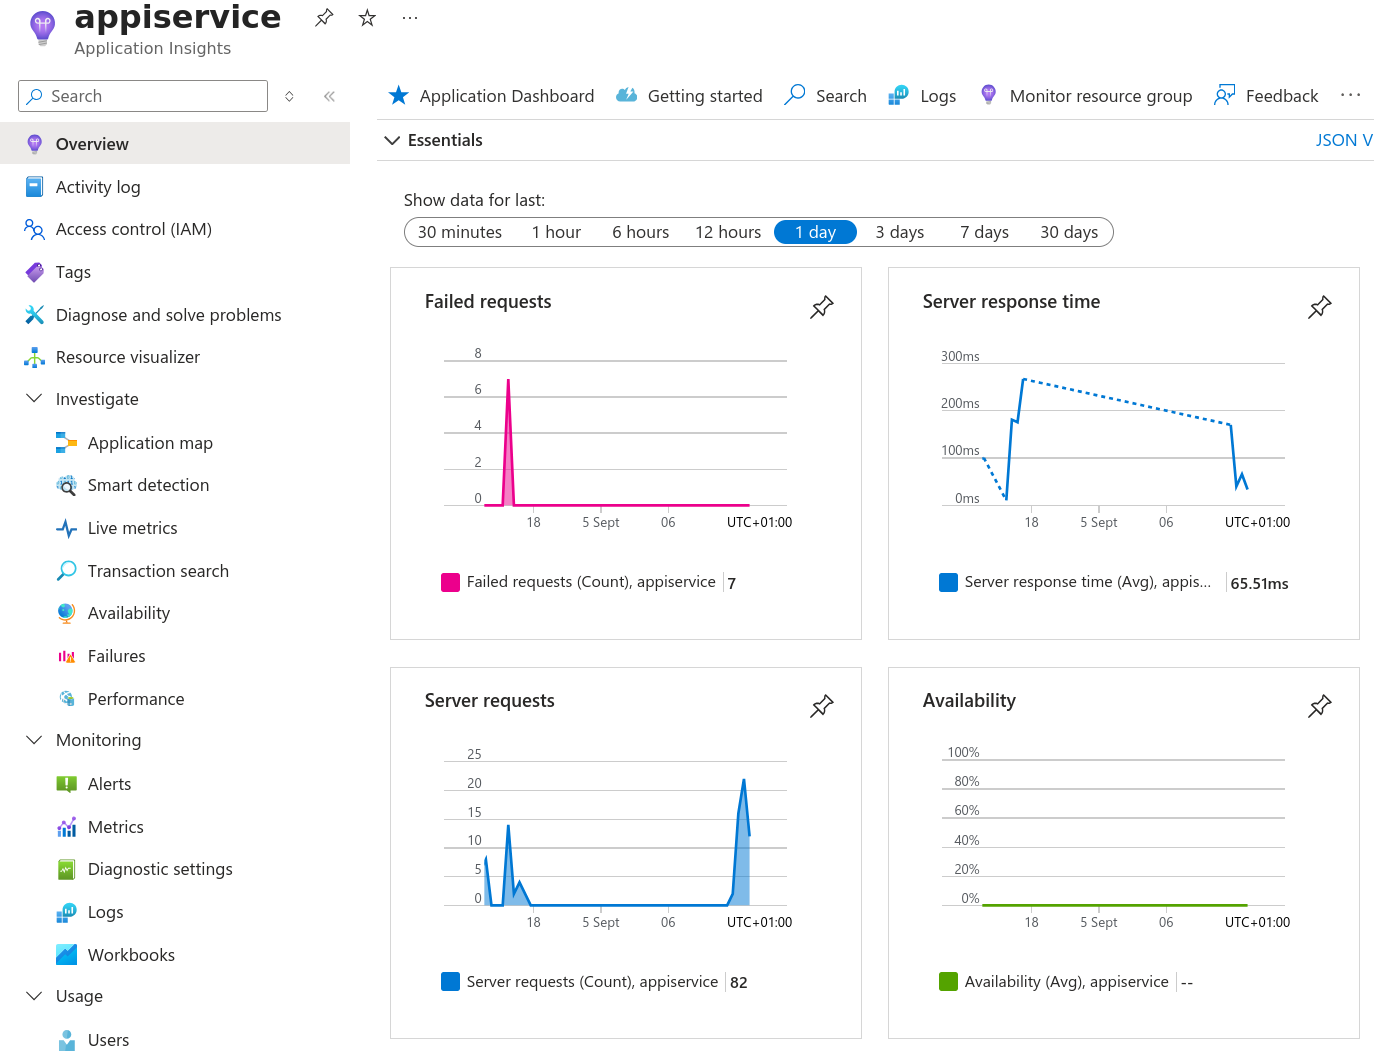
Click on the ‘appiservice’ resource, this is where you interact with the logs of the service and understand its usage
-
This page presents an ‘Overview’ of failed logins, response time and number of requests served.
-
There are a number of other data views available:
- Service Map (navigate via )
-
Provides a top down view of how the service is functioning, what it talks to and how long it takes. If a link has errors, it will show up colorized in red as somewhere to begin investigating problems if they occur.
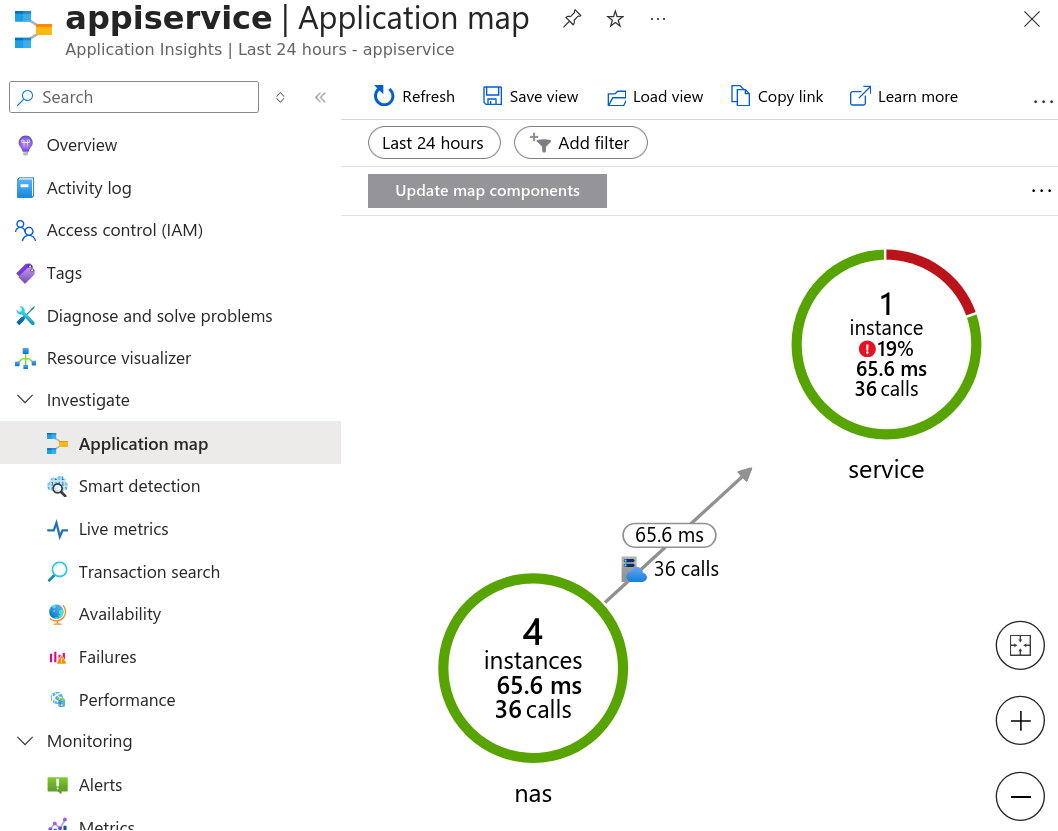
This is particularly useful for eduroam® and OpenRoaming™ participants. - Requests (navigate via )
-
Fetch the data by either clicking on the button See all data in the last 24 hours or picking a timeframe from the top left. The result is a number of rows labeled ‘TRACE’ (green) represents every packet between your wireless equipment and RADNAC and ‘REQUEST’ (blue) corresponds to each authentication, clicking on the latter shows an overview of how long it took and how the authentication took place
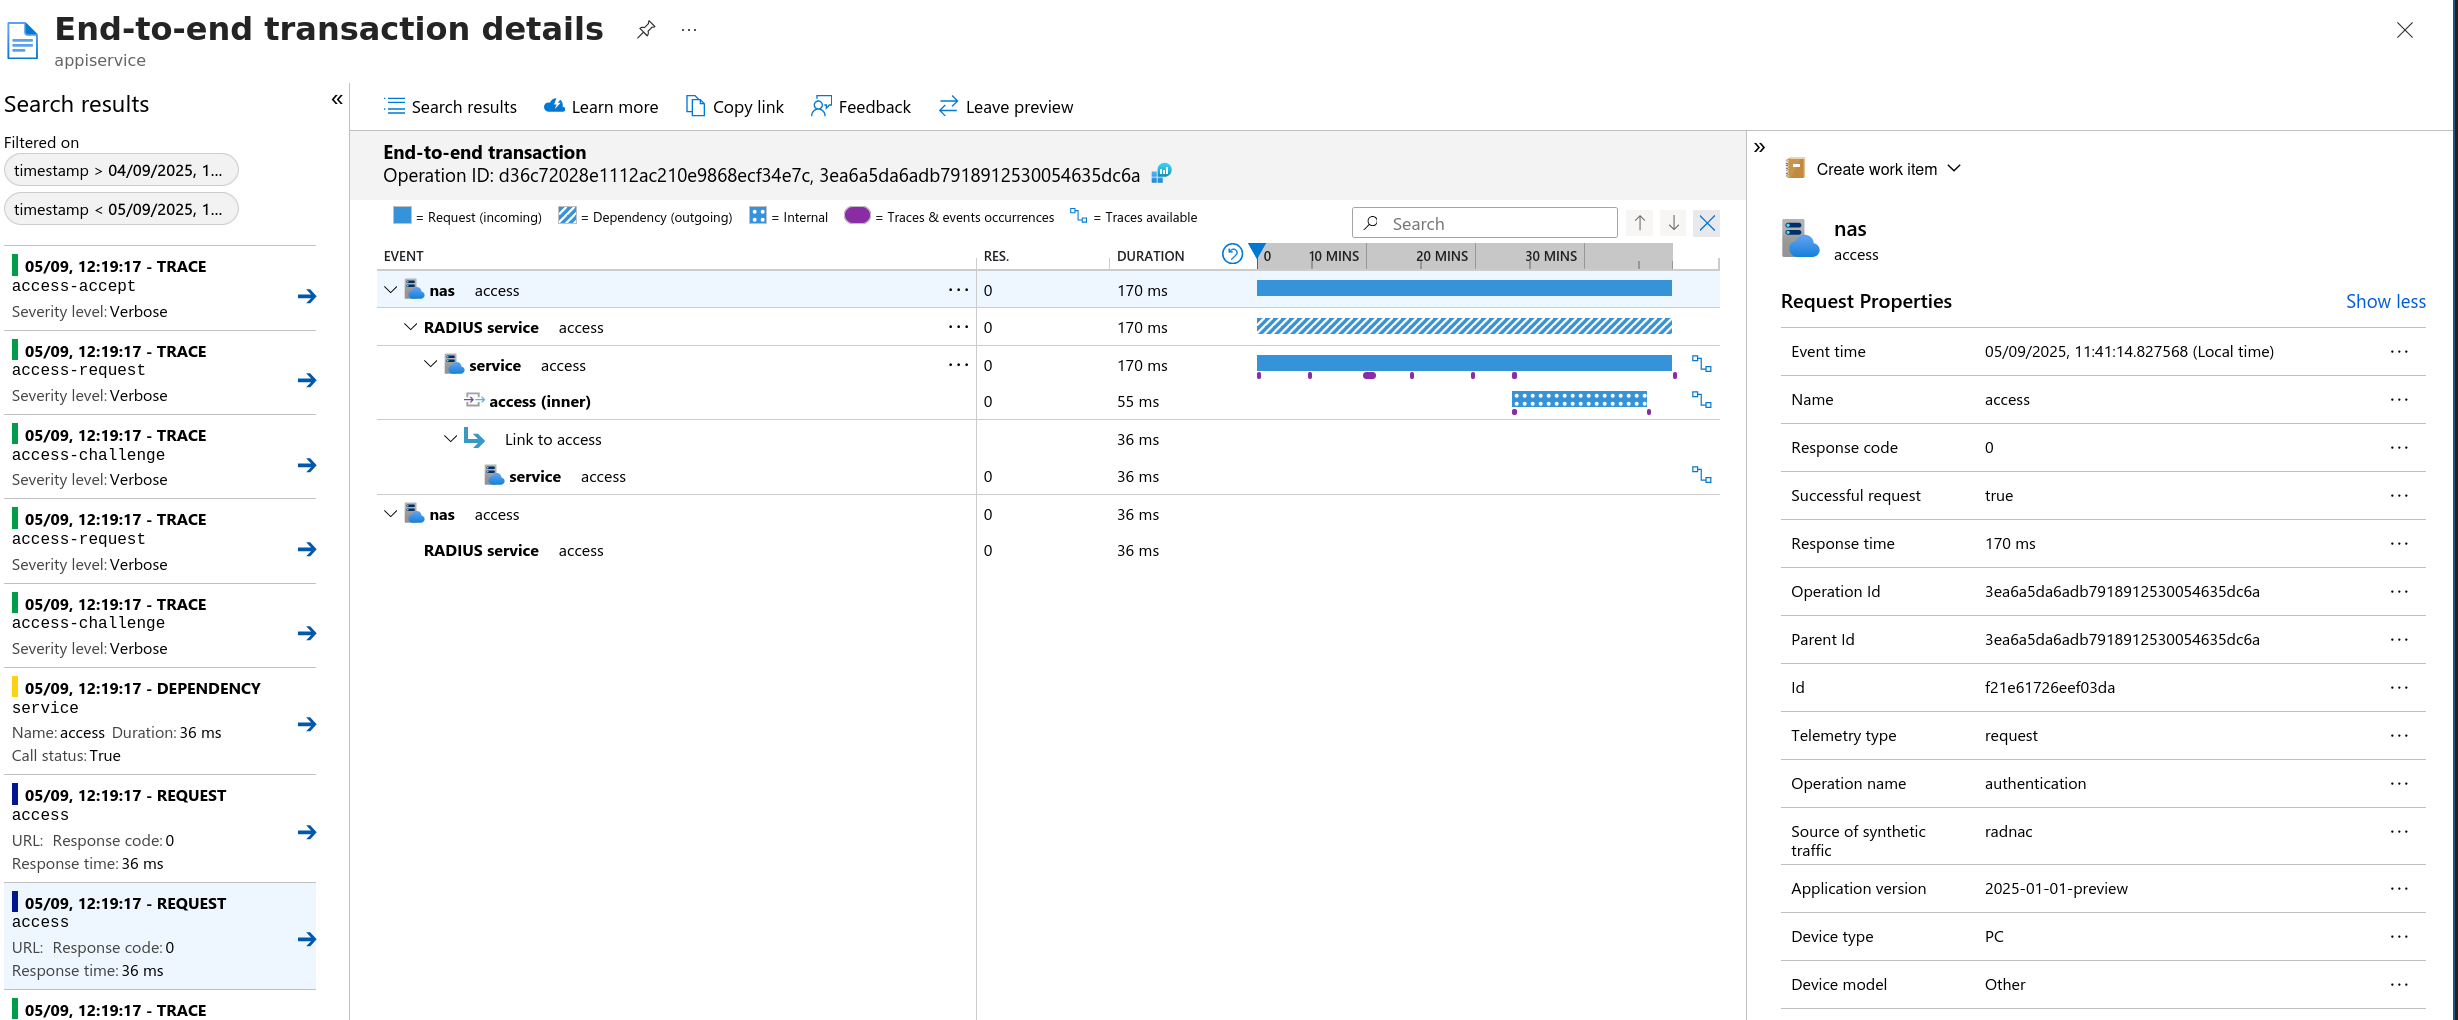
A summary of what you are seeing:
- Purple Dots
-
Represent individual packets received and sent by the service. For when they appear on the ‘inner’ access requests these are the embedded contents that make up the inner request.
- Opaque Blue Section
-
The duration of the entire request made up of a sequence of two (usually one request and one response) or more packets.
- Partially Opaque Blue Section
-
The duration of the virtual request; same as the main request but associated with either the devices (clients and proxies) involved or the embedded inner request wrapped by the main request.
- Arrows
-
This shows which latter (and former) requests are associated with this request. This means you can determine which EAP-(T)TLS sessions TLS session resumption was coupled to as well as which accounting (usage) sessions were created based on which authentication.
- Failures (navigate via )
-
View showing the errors (failed authentications) and allowing you to drill down into the issue.
- User Logins (navigate via )
-
Explore how each one of your users is connecting, use the filter ‘Authenticated user Id’ to search for a given user (for example ‘
Authenticated user Id == bob’). - Sessions (navigate via )
-
Explore how long connections were maintained.