Installing
If you have not already worked through the Quickstart Howto guide, you should start there to get familiar with the product. Afterwards, return here to then move onto planning and deploying your production service.
Planning
There are some considerations when deploying the service. These decisions need to be made ahead of time as Azure does not allow for many of the decisions here to be changed after the install. For example changing the tier, location or SLA requires a new installation. Parameters that may be changed post install are labeled, otherwise assume they cannot be without migrating to a new deployment.
RADNAC has been carefully designed to incur only negligible costs outside of the instances used. The single exception to this is data stored in Azure Monitor which depends on how much activity there is on-premise for your wireless network. This in practice tends to be insignificant as not much is generated, outside of the education sector, as this is where logs and metrics of the usage of the service is located. There are cost controls accessible to you, in particular ‘Log data retention’ and ‘Log data export (to Azure Storage)’.
Marketplace Offer
This is where you pick the tier to suit your needs. Listed in the Azure Marketplace are three plans, tiered as ‘Home’, ‘Team’ and ‘Enterprise’ varying on pricing.
The main difference between the tiers:
- Home
-
Focusing on high functional and low cost. Suitable for home, small companies (fewer than ten staff) as well as evaluations, development and testing.
- Team
-
Allows you to grow and scale your deployment, such as reliability, proxying and faster connecting speeds for devices.
- Enterprise
-
Provides compliance and audit functionality, such as Microsoft Defender for Cloud.
This tier also offers a publisher managed (co-admin) access plan which you may pick if you have a prior support agreement with coreMem Limited with the caveat that by selecting it we will be able to access your data, including logs that contain Personally Identifiable Information (PII).
There is an FAQ entry that provides more details on the differences between the tiers.
Location
Choose a location that is placed close to your RADIUS clients (eg. your wireless access points). Reason to instead pick a more distance location would be due to your local compliance requirements or to choose a location that is zonal to obtain a better service SLA (for example ‘UK South’ is zonal whilst ‘UK West’ is not).
Reliability
For non-‘Home’ tier you have the option to improve the availability of the service by configuring the deployment to use two VMs, that Azure backs with a monthly SLA depending on the topology:
-
two VMs deployed to different zones in the the same region delivers 99.99% (‘four nines’)
-
two VMs deployed to the same data center (ie. non-zonal region) delivers 99.95% (‘three-and-a-half nines’) using an availability set
-
consider this for non-technical reasons (eg. legal, compliance, …)
-
it is almost always better to pick a slightly more distant zonal region than to deploy to a non-zonal region
-
-
single VM delivers 99.9% (‘three nines’)
| Running two VMs will double your Azure infrastructure running costs for the service. |
Networking
- Security and Encryption
-
The majority of vendor RADIUS products do not support sending traffic securely over TLS (such as RadSec or RADIUS/1.1) and instead are limited to RADIUS over UDP (or TCP) which transmits credentials and PII unencrypted.
To mitigate this requires configuring a local on-premise router to connect to an Azure VPN Gateway to bridge your on-premise equipment to be able to use the private IPs of the service securely.
This may not be an option for you for a variety of reasons, or at least initially, but as long as you plan to only support wireless network connectivity (and not administrative login into devices such as management consoles on switches) you are ‘probably okay’ as 802.1X/EAP will crucially secure the credential part for you. If you plan to use ‘bare’ RADIUS over the Internet, you should plan to migrate off it in the near future, preferable to move to a wireless vendor supporting either RadSec or RADIUS/1.1, a router that supports an IPsec VPN to Azure, or wait for our roadmapped plan to provide software to host on a on a small on-premise server (such as an old laptop or $50 Raspberry Pi) to translate your local insecure RADIUS to the latest secure TLS based RADIUS safe for use over the Internet.
- Public IPs
-
Public IPs allow you on-premise equipment to talk to the service without the need for a VPN to Azure. One reason to not use public IPs is if you plan to send all your on-premise RADIUS traffic over an Azure VPN Gateway allowing you to rely completely on using Private IP addresses instead.
If in doubt, assign both IPv4 and IPv6 addresses which comes at an additional cost of $3.65 per month per VM.
You must assign at least either a public IPv4 or IPv6 address due to limitations of Azure as it is not possible to access either Azure Resource Manager or Microsoft Entra ID from a Private IP address without the additional costs of a NAT Gateway and Private Link. For those sensitive to costs, particular ‘Home’ tier users, if you are familiar with networking or have the time to validate the deployment, one option is to use IPv6 public IP addresses only (disabling IPv4) to avoid this cost altogether. Do first check if your RADIUS equipment supports sending RADIUS requests over IPv6 (Ubiquity do not!) otherwise you will need to explore running an on-premise proxy taking the form of either NAT-PT, FreeRADIUS, building a workaround with ‘ socat -T 3 UDP4-LISTEN:1812,fork,reuseaddr UDP:[2001:db8::1]:1812’ or alternatively contact us regarding our roadmapped proxy workaround solution.If you do use public IP addresses, it is strongly recommended to pre-create static standard regional (zone-redundant for zonal regions) SKU public address(es) in the location you plan to run RADNAC in. The reason is that when you wish upgrade or move to a replacement deployment you will be able to migrate the IPs and avoid reconfiguring all your RADIUS equipment to use new public IP addresses.
- 802.1X (with EAP-TLS and EAP-TTLS/PAP)
-
If you plan to use 802.1X (eg. wired or WPA-Enterprise wireless) networking you must pre-create a Key Vault in another resource group, configure a suitable server certificate to use and provide RADNAC access to it.
You can use a Let’s Encrypt issued certificate by using automated tooling such as Acmebot for Azure Key Vault You are responsible for configuring your the supplicants of the connecting devices to validate the certificate the service presents. The risk of not doing so is the exposure to MitM attacks. Make sure to verify both the certificate authorities (CAs) you wish to allow as well as the hostname presented.
Installing
Start by going to the RADNAC offer page on the Azure Marketplace, alternatively you may go to the Azure Marketplace and search for ‘RADNAC’ making sure the publisher list for the offer is ‘coreMem Limited’.
| If you wish to do this programmatically with a Deployment Template then you should look to our Installing Programmatically documentation. |
Selecting it takes you to a page asking you to pick the subscription and plan which corresponds to tier. Select a non-support based plan, unless instructed otherwise by pre-arrangement.
Service Principal with Elevated Permissions used during Installation
During the install, RADNAC configures the complicated integration between Microsoft Entra ID, Azure and its-self on your behalf. To do this it requires a Service Principal with extra permissions that usually are not avaliable to it when installing from the Azure Marketplace.
For more details on the purpose of this Service Principal and how it is used look to our security page.
To do the preparation work for this, take the following steps:
-
Navigate to Microsoft Entra ID found at https://entra.microsoft.com/.
-
From there navigate from the left sidebar through and fill out the boxes with:
- Name
-
Set to ‘RADNAC Deployment’.
- Supported account types
-
Select from the dropdown ‘Single tenant only - Default directory’.
- Redirect URI (optional)
-
Leave this at its default of empty.
Now click on the Register button at the bottom of the page.
-
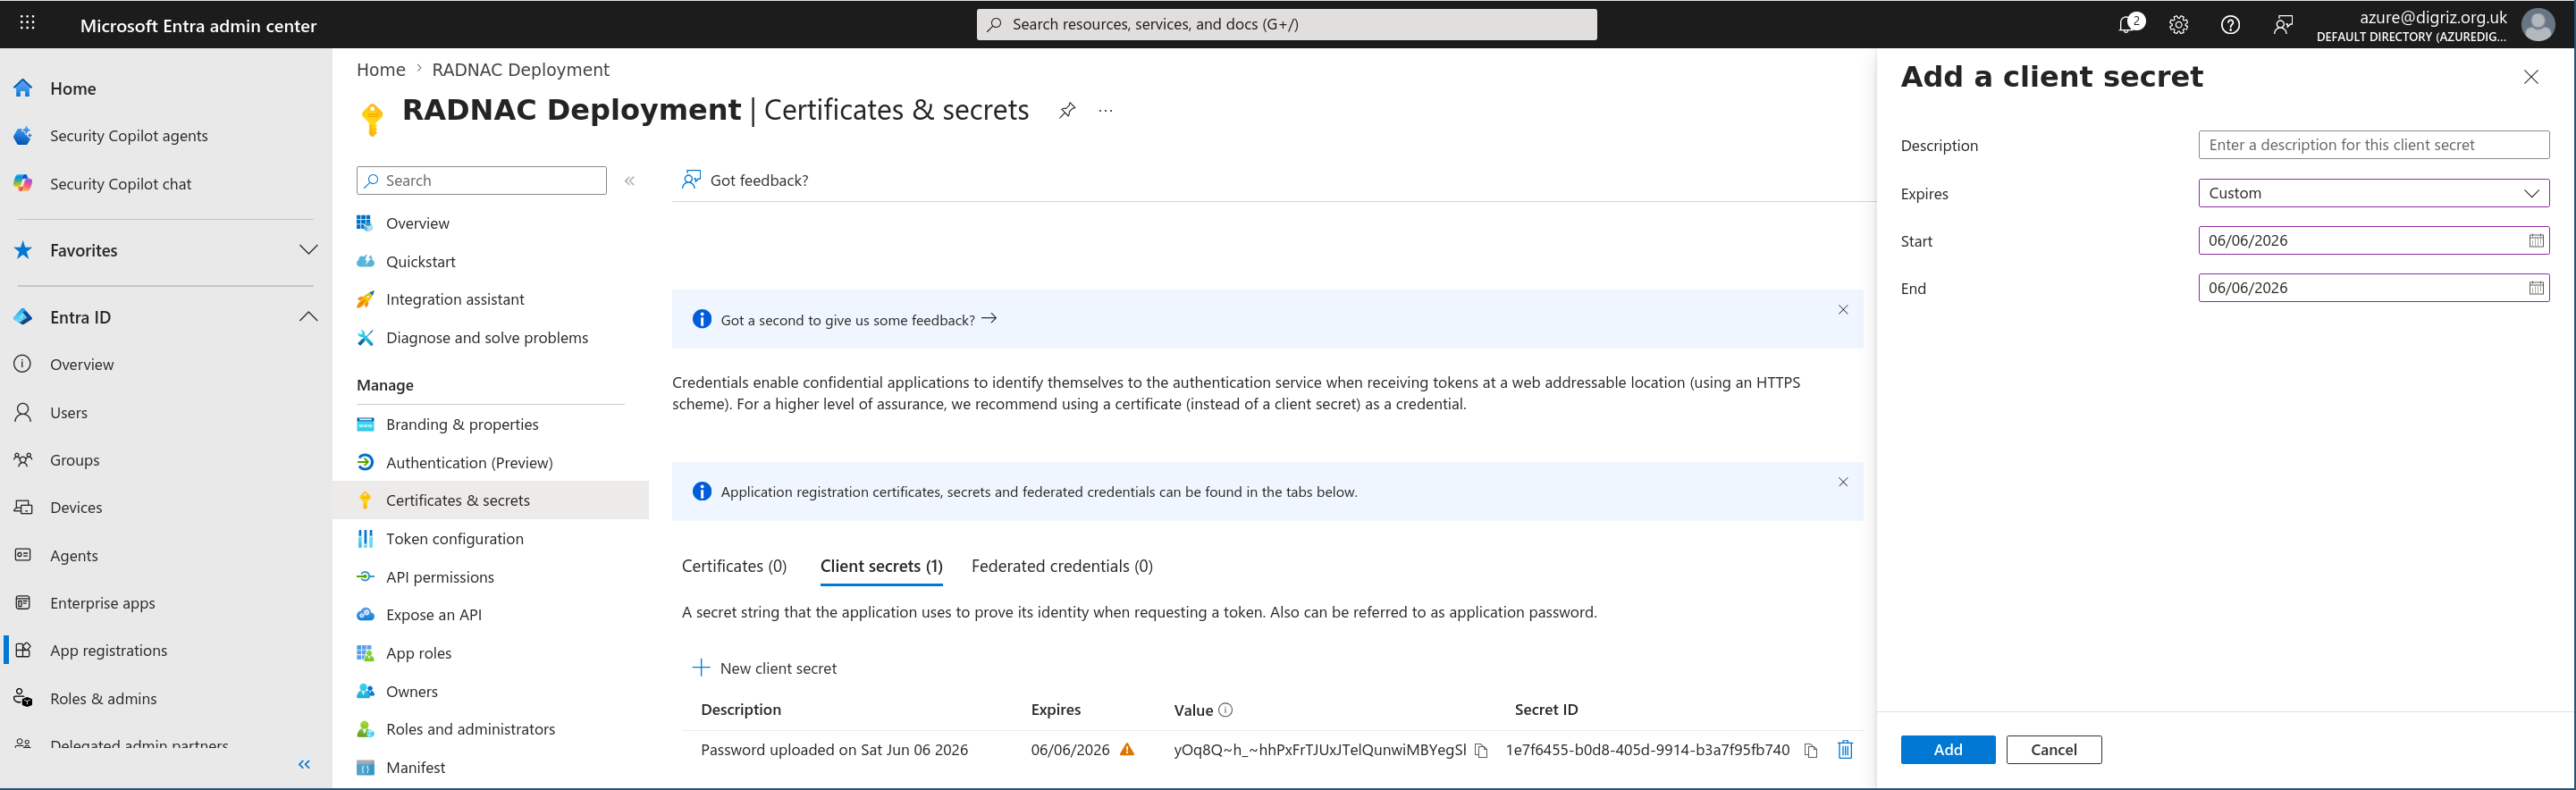
Now navigate from the inner left sidebar through , in the panel that opens:
- Description
-
Leave blank.
- Expires
-
Set to ‘90 days (3 months)’, though better is to select ‘Custom’ and set the start date to today and the end date to either today (midnight) or tomorrow.
If you select a custom date, be careful to not accidently set a future start date.
Now click on the Add button at the bottom of the panel.
-
You will be shown a credential has been added and you will to make a note of ‘Value’ (not the ‘Secret ID’) for later use, for example by using your clipboard to copy it into Notepad (Microsoft Windows) or TextEdit (macOS), this we will refer to as the ‘Client secret’ (password).
-
Now navigate from the left sidebar through .
-
Search for ‘Cloud Application Administrator’, select it to open a new panel, click on the Add assignments button at the top, search for the application registration you just created (called ‘RADNAC Deployment’, it will not show until you start typing), select it and click on the Add button at the bottom.
-
Repeat the last step also for the role ‘Privileged Role Administrator’.
Steps
Start the wizard by clicking Create.
Basics
Verify the subscription (where billing is applied) is as you expect, and choose (or create) a resource group to place the for RADNAC. It is recommended you use an empty resource group or one containing only other managed applications.
Select the region you want to use, and for the region for the API select a region as close to your main region that you can.
| The resource placed at ‘API Region’ stores no data and is separated as Azure only allows this resource type to be placed in a limited number of locations. |
The SLA drop down shown here refers to Azure’s own SLA commitments and by picking an option above the base 99.9% (three nine’s) RADNAC will install a second instance endpoint to provide that resilience, though this will double your monthly running costs (as now you need two VMs, two disks, two IPs, …).
Application Name should be set radnac (or a name based on this) to ease identification of where you interact with RADNAC in the above selected resource group whilst the Managed Resource Group is mostly non-user managed and is where all the resources that make up RADNAC are located; this latter resource group can be named anything but it is recommended you use a format such as mrg-radnac-YYYYMMDD.
Networking
For simplicity it is recommended you select ‘New’ for all the IP addresses, even if you plan to use pre-allocated IPs as recommended earlier. It is an easier process to switch to your chosen IPs post installation and so you should just push the Next here.
VM
Here you pick the parameters of the instance(s) you want to use:
- CPU
-
More CPU means more things the service can do. RADNAC does not use much at all, most of the CPU usage is needed to supporting extra Azure extensions that are installed as you increase the memory of the system.
Two (2) vCPUs are recommended, though one (1) can suffice, more than four (4) is unnecessary.
- RAM
-
-
less than 1GiB: Only RADNAC running
-
1GiB (or higher): Inclusion of Application Health and Guest Attestation (only on a Trusted Launch supporting instance) extensions
-
2GiB (or higher): Inclusion of Azure Monitor Agent and Azure Machine Configuration extensions
-
more than 4GiB: Unnecessary
-
- Disk
-
Use of ‘Premium SSD’ is recommended, though if you are sensitive to costs, such as being a home tier user, you can use ‘Standard SSD’ for no notible difference in performance.
To choose the the size of the OS disk, Azure bill based on the band sizing you use so you will be billed the same for 5GiB as you would for 8GiB. You can select any value, but due to this banding, it makes little sense to select anything other than 4GiB, 8GiB or 16GiB. It is recommended you assign 8GiB of disk space to support Azure’s daemons, though if you use an instance with 1GiB or less of RAM then 4GiB for your disk size will suffice as not all those daemons are used, whilst values of 16GiB or more makes no sense and disallowed.
The reason for not needing much disk space is all logging and metric data is moved off the instance to other Azure services. Other than the space needed by the OS (particular during updates) and any installed Azure daemons and extensions, the only disk space needed by RADNAC is the small amount necessary to handle the period of time where the data is being transferring to those Azure services.
‘Standard HDD’s are not supported. If you choose an instance type that supports Ephemeral OS disks, which are in practice very fast local SSDs that are provided at no extra cost by Azure, any settings you provide here will be ignored and the ephemeral option will be used instead.
By tier, the recommended instance sizes are (in descending order of cost):
- Home
-
-
B2ls v2
-
B2ats v2
-
B1ls
Azure are retiring the ‘B1ls’ instance type at the end of October 2028
-
- Team
-
-
B2ls v2
-
B2als v2
-
- Enterprise
-
-
D4als v6
-
B2als v2
-
B2ls v2
-
Advanced
Here are some less common options, that usually you will want to skip over.
- VNet Subnet Addresses
-
This is useful when planning to use a VNet peering and control over the subnets used is desirable to avoid IP clashes in your routing tables between VNets.
- Application Certificate
-
This only should be changed if you have local policy or compliance needs that dictate this.
- Unique String
-
Some resources require a globally unique name as they appear in DNS and must not clash with similar resources in other Azure accounts. It is unnecessary for you to provide a value here as the install process generates a random value for you, but it is provided in the event you do need this.
Tags
This is used to tag resources during the install, which local policy may dictate is necessary.
| Tags may be updated after install at any time. |
After the Install
Networking
If you pre-allocated the public IP addresses to use and as recommended used ‘New’ earlier, now it is time to switch over the IPs.
Navigate to the managed resource group, from the managed application, click on ‘Managed resource group’ found to the top right, and for each ‘Network interface’ resource (name prefixed with ‘service’ and suffixed with ‘nic’) do:
-
Go to
-
We now switch each of the existing IP address associations with the new ones you pre-allocated:
-
Click on the name (either ‘v4’ or ‘v6’)
-
Amend to point now to your pre-allocated IP address
-
Click on Save
-
-
Click on Apply
Now look for ‘Public IP address’ resources (name prefixed with ‘pip’) in the managed resource group and delete them all to avoid being charged for resources that are no longer in use.